Thursday, April 22, 2010

Save typing

A friend writes:

Stupid Revit trick.

If you type in:
   2 10

It is the same as 2’-10”

Wednesday, April 21, 2010

Hatchmaker

Revit uses old-school Autocad hatch patterns (.pat files) but provides no means to create them.  Lanny Schiele created a great Autocad utility for drawing patterns years ago, and it still works well.

http://cadtips.cadalyst.com/patterns/hatch-maker
http://revitclinic.typepad.com/my_weblog/2008/11/custom-fill-pattern-anyone.html

Hatch patterns set to orient to object is one way to "ziptape" firewalls.  Although cumbersome, this method ensures that the pattern sticks with the wall.  Revit feature request:  Wall centerline that allows setting of width, linetype, color, and location within wall!

Wednesday, April 14, 2010

Creating storefront openings with doors in Revit

Most tutorials I've seen on adding storefront doors assume the simplest case, a 1x1 grid panel.  This video shows a door taking up more grids, which means the mullions can have a more complex or interesting layout independent of the door panel itself.

Tuesday, April 6, 2010

Change surface patterns from drafting to model for walkthroughs

Drafting patterns like Concrete or Plaster-Gypsum generally look good on surfaces in still 3D views, but drafting patterns "swim" in walkthrough animations.  Model patterns look better in walkthroughs.  Revit 2010 comes with few model patterns;  to import more try the Migrating hatch patterns how-to.  (For some reason the two pattern types are separated, and it's not possible to just change or duplicate one to another type.)

The videos below demonstrate the difference.  (I suggest clicking the fullscreen button in lower right corner to see the patterns better.)  The example is a stippled wall using Revit's built-in Plaster-Gypsum drafting pattern in the first video, and an imported model pattern in the second video.

DRAFTING pattern:


MODEL pattern:


Another artifact problem is evident, with surface pattern visibility switching on and off depending on view distance.  Some cases of this can  be reduced by creating high-resolution animation images as a series of jpgs, and down-sampling in video software for the final render size.  That's a completely different topic, but let's see if Revit 2011 improves the situation!

How to make the change- Under Manage, click Materials and highlight the desired material.  Click the button adjacent to Surface Pattern.  It should look something like this:


In this example the current surface pattern is Drafting type.  Click on Model and choose a new pattern.  Here I've selected "concrete-model" which was previously imported from AutoCAD:

I might revisit this topic after trying it out in Revit 2011.  Needed to post it now while it was still in my brain.  if nothing else, demonstrates the differences between pattern types in 3D views.

Revit release date update (Not April 8th)

Blah, sounds like Autodesk is backing off Revit release date
Revit release date update (Not April 8th)

Tuesday, March 30, 2010

How to modify a door family - Part 2

Part 2 of door family modification-
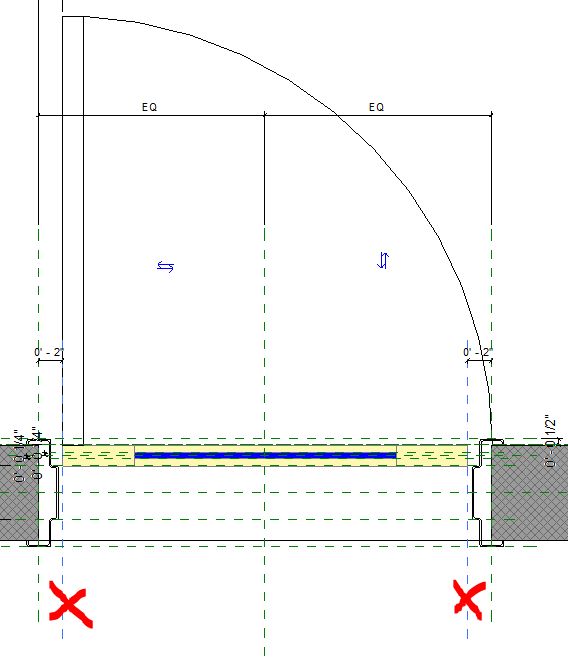
Now we're going to take out a couple of reference planes that constrain the necessary resizing of the door.  Sometimes it's easier to take them out and redraw than to unravel multiple constraints.  Really two doors, the 3D version and the plan version (detail object).  These are set 2" off the rough opening work planes, select and delete:


Grab the door panel extrusion and stretch the jambs to align with the frame jambs.  Next constrain each door jamb by clicking on the alignment constraint (the little lock):


That takes care of the 3D part of the door.  [Note: It's often best to create reference planes for constraint rather than constraining geometry-to-geometry.  "So far" I haven't had a problem without them when the plane would just be sandwiched between geometry.]  The panel will size automatically when Width, Height, Panel Width, or Panel Height are changed in the Family Type parameters.  A couple examples in 3D:


But back to 2D- the Door-Swing detail item represents the door in plan view.  At the moment it resizes correctly but is off-center.  There's already a 2" dimension on the hinge side.  It turns blue when the door is highlighted, which means it's associated with the door.  Manually edit it to 1" and the door will move to center.  Lock down the constraint:


Save the door, it's finally done!  Well, mine's done, anyway, let me know if it worked for you.  And don't worry even one second about the constraints and work planes that were blown off;  perhaps families can become over-constrained during the process of creation.


Monday, March 29, 2010

How to modify a door family - Part 1

This is Part 1 of a hack to modify an existing door family to more accurately match actual construction.  The results appear to work but are not rigorously tested, so make a backup first.

Door families with hollow-metal frames are out there, but haven't come across one that creates a rough opening correctly out-of-the-box. Example using one of the doors downloaded from Reed Construction's SmartBIM: Probably any of Reed's flush doors with a hollow-metal frame will do; I'll be looking at 'Door_Single_Glazed-1-Lite_Reed'. We're ahead of the game here already compared to Revit's default doors because it's a complete frame, not just trim that only appears in 3D. Both doors pictured are 3'0. The 'before' door is cutting a 3'4 rough opening. What's needed is a 3'2 R.O. per 'after'.
 
Open the door in the family editor and go to the Ref.Level view. Selecting items reveals a network of constraints. Of the various ways to revise the family, it seems that altering the frame sweep profile affects
the fewest constraints. Select the door frame and choose Edit Sweep-> Select Profile-> Edit Profile from the ribbon bar. Should see something like this:Select all the lines and arcs that make up the frame and move them 1" to the right. About five "constraints are not satisfied" errors will result. Hit Remove Constraints, Finish Profile, and Finish Sweep. Another "constraints are not satisfied" may appear, so again hit Remove Constraints. We'll get back to tidying the necessary constraints.

The hollow metal frame overlaps the wall an inch, good, but now the door panel is too narrow for the opening. Likewise the detail item (plan view swing) is too small. Hit Types on the ribbon bar, scroll down to the Dimensions heading within the Family Types dialog, and change the height and width. It's probably 7'-2" and 3'-4". Change it to 7'-1" and 3'-2", the rough opening size for a standard 3' x 7' door frame. Now scroll down further for the truly sneaky but elegant part... under the "Other" heading are the formulas for the door panel size. Originally it's subtracting 2" all around but should be 1". Change the formulas to match the following:


Hit OK... part 2 to follow.