Blah, sounds like Autodesk is backing off Revit release date
Revit release date update (Not April 8th)
Showing posts with label AutoCAD. Show all posts
Showing posts with label AutoCAD. Show all posts
Tuesday, April 6, 2010


Friday, March 26, 2010
Migrating hatch patterns from AutoCAD to Revit
Here's one way to migrate hatch patterns from AutoCAD to Revit-
Open acad.pat in a text editor, maybe a good tabbed text editor like Notepad++, and highlight the desired pattern. It will look something like:
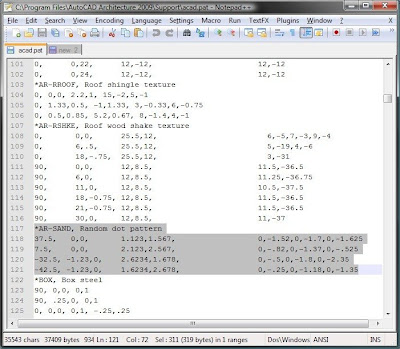
Copy-paste the highlighted pattern into a new text file. Add a new line at the bottom to tell Revit what type of pattern it is.
;%TYPE=MODEL
or
;%TYPE=DRAFTING
Save the file as "somename.pat" and import it as the desired pattern type, model or drafting. How to import? Straight out of Revit 2010 help:
Creating a Custom Fill Pattern
Open acad.pat in a text editor, maybe a good tabbed text editor like Notepad++, and highlight the desired pattern. It will look something like:

Copy-paste the highlighted pattern into a new text file. Add a new line at the bottom to tell Revit what type of pattern it is.
;%TYPE=MODEL
or
;%TYPE=DRAFTING
Save the file as "somename.pat" and import it as the desired pattern type, model or drafting. How to import? Straight out of Revit 2010 help:
Creating a Custom Fill Pattern
- Click Manage tab->Project Settings panel->Settings drop-down->Fill Patterns.
- In the Fill Patterns dialog, under Pattern Type, select Drafting or Model.
- Click New.
- If you are creating a drafting fill pattern, select how to orient the fill pattern in the host layers. See Fill Pattern Host Orientation for details.
- In the New Pattern dialog, select Custom.
- Click Import.
- Select the desired pattern file (PAT), and click Open. See Custom Pattern Files for information on creating a custom pattern (PAT) file.
- NoteDefault Revit Architecture fill patterns are stored in the revit.pat and revit metric.pat files in the Revit Architecture program group Data directory. The revit metric.pat file contains various metric masonry and iso patterns.
- Click the menu next to Import to view the list of available patterns. Select a pattern from the list.
- If desired, enter a new name for Name.
- If desired, enter a value for Import scale.
- Click OK twice.
Subscribe to:
Posts (Atom)


 Posts
Posts


